可是很多人project structure常常缺乏這個選項 ,當然可以自己在manifests增設權限、加libs~~
如圖:
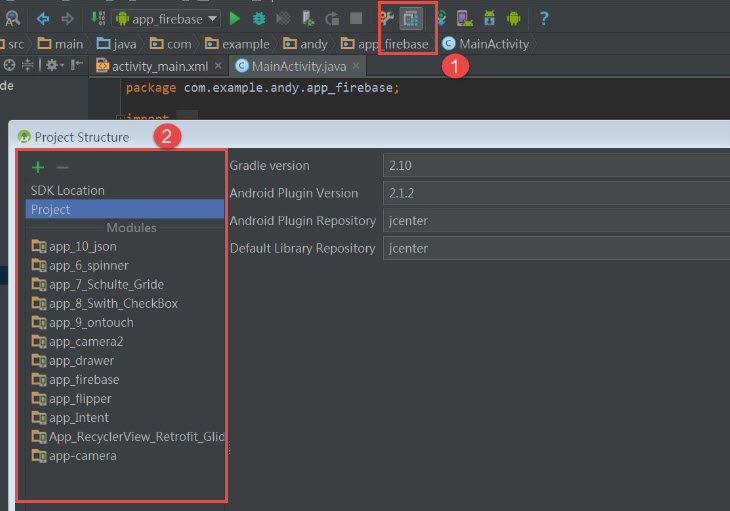
解決方式

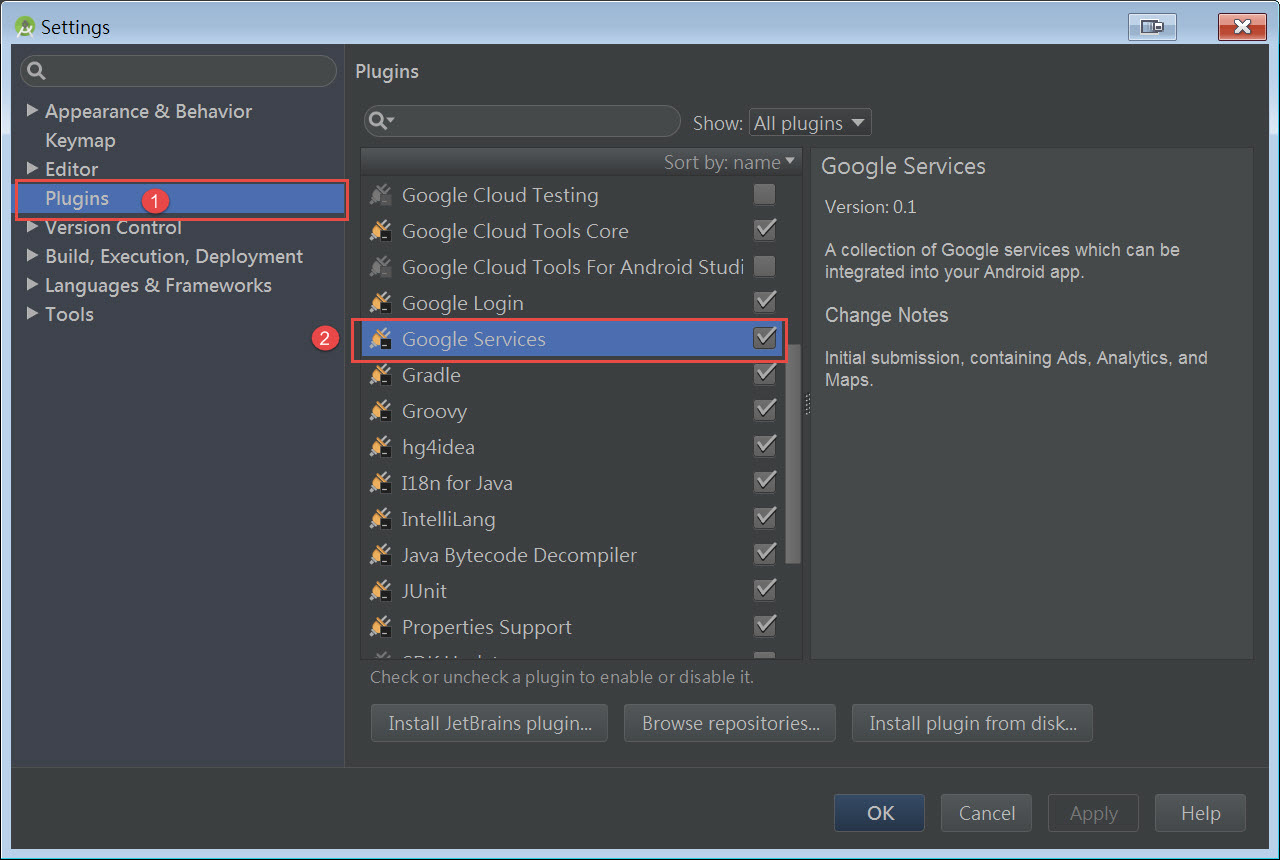

這樣就完成囉!


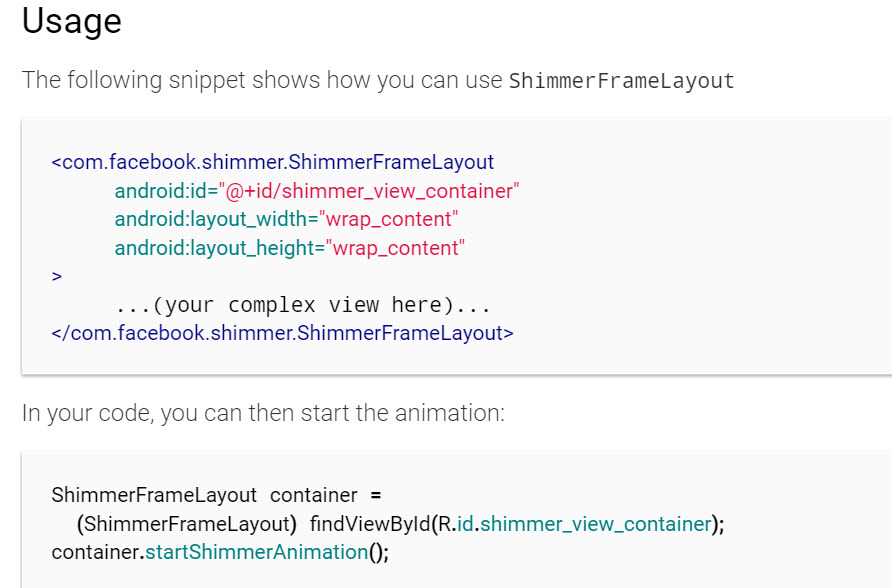
<?xml version="1.0" encoding="utf-8"?> <LinearLayout xmlns:android="http://schemas.android.com/apk/res/android" xmlns:tools="http://schemas.android.com/tools" android:layout_width="match_parent" android:layout_height="match_parent" android:background="@android:color/background_dark" android:orientation="vertical" android:paddingBottom="@dimen/activity_vertical_margin" android:paddingLeft="@dimen/activity_horizontal_margin" android:paddingRight="@dimen/activity_horizontal_margin" android:paddingTop="@dimen/activity_vertical_margin" tools:context="com.example.tp1606008.app_function.MainActivity"> <com.facebook.shimmer.ShimmerFrameLayout android:id="@+id/shimmer_view_container" android:layout_width="wrap_content" android:layout_height="wrap_content"> <TextView android:id="@+id/tv_message" android:layout_width="wrap_content" android:layout_height="wrap_content" android:text="就是要帥~~!!!!" android:textColor="@android:color/holo_red_dark" android:textSize="50dp" /> </com.facebook.shimmer.ShimmerFrameLayout> <com.facebook.shimmer.ShimmerFrameLayout android:id="@+id/shimmer_view_container2" android:layout_width="wrap_content" android:layout_height="wrap_content"> <TextView android:layout_width="wrap_content" android:layout_height="wrap_content" android:text="就是要帥~~!!!!" android:textColor="@android:color/holo_purple" android:textSize="50dp" /> </com.facebook.shimmer.ShimmerFrameLayout> <com.facebook.shimmer.ShimmerFrameLayout android:id="@+id/shimmer_view_container3" android:layout_width="wrap_content" android:layout_height="wrap_content"> <TextView android:layout_width="wrap_content" android:layout_height="wrap_content" android:text="就是要帥~~!!!!" android:textColor="@android:color/holo_blue_bright" android:textSize="50dp" /> </com.facebook.shimmer.ShimmerFrameLayout><com.facebook.shimmer.ShimmerFrameLayout android:id="@+id/shimmer_view_container4" android:layout_width="wrap_content" android:layout_height="wrap_content"> <TextView android:layout_width="wrap_content" android:layout_height="wrap_content" android:text="就是要帥~~!!!!" android:textColor="@android:color/holo_green_light" android:textSize="50dp" /> </com.facebook.shimmer.ShimmerFrameLayout> </LinearLayout>
package com.example.app_function;

import android.animation.ObjectAnimator;
import android.os.Bundle;
import android.support.v7.app.AppCompatActivity;
import android.widget.TextView;
import com.facebook.shimmer.ShimmerFrameLayout;

public class MainActivity extends AppCompatActivity {
   private ShimmerFrameLayout mShimmer;
   private ShimmerFrameLayout mShimmer2;
   private ShimmerFrameLayout mShimmer3;
   private ShimmerFrameLayout mShimmer4;

   @Override
   protected void onCreate(Bundle savedInstanceState) {
       super.onCreate(savedInstanceState);
       setContentView(R.layout.shimmer_view);
       findId();
       shimmer();
   }

    //Step1:先findViewById找到View
   public void findId(){
       mShimmer  = (ShimmerFrameLayout)findViewById(R.id.shimmer_view_container);
       mShimmer2 = (ShimmerFrameLayout)findViewById(R.id.shimmer_view_container2);
       mShimmer3 = (ShimmerFrameLayout)findViewById(R.id.shimmer_view_container3);
       mShimmer4 = (ShimmerFrameLayout)findViewById(R.id.shimmer_view_container4);
   }

   public void  shimmer(){
       //Step2:開始設定mShimmer效果 (效果的參數 文章下方或官網都也有介紹)
 style="line-height: normal;">       mShimmer.setDuration(5000);
       mShimmer.setRepeatMode(ObjectAnimator.REVERSE);

        //設定mShimmer2效果
       mShimmer2.setBaseAlpha(0.1f);
       mShimmer2.setDropoff(0.1f);
       mShimmer2.setTilt(5);
       mShimmer2.setDuration(4000);

        //設定mShimmer3效果
       mShimmer3.setAngle(ShimmerFrameLayout.MaskAngle.CW_90);
       mShimmer3.setDuration(4000);

        //設定mShimmer4效果
       mShimmer4.setBaseAlpha(0);
       mShimmer4.setDuration(5000);
       mShimmer4.setDropoff(0.1f);
       mShimmer4.setIntensity(0.35f);
       mShimmer4.setMaskShape(ShimmerFrameLayout.MaskShape.RADIAL);
   }

   @Override
   protected void onStart() {
       super.onStart();
   }

   @Override
   public void onResume() {
       super.onResume();
        //Step3:開始執行
       mShimmer.startShimmerAnimation();
       mShimmer2.startShimmerAnimation();
       mShimmer3.startShimmerAnimation();
       mShimmer4.startShimmerAnimation();
   }

   @Override
   public void onPause() {
        //Step4:onPause的時候記得暫停
       mShimmer.stopShimmerAnimation();
       mShimmer2.stopShimmerAnimation();
       mShimmer3.stopShimmerAnimation();
       mShimmer4.stopShimmerAnimation();
       super.onPause();
   }
}
Attributes
You can control the look and pace of the effect using a number of custom attributes on the
ShimmerFrameLayout tag. Alternatively, you can set these values on the layout object itself. For a comprehensive list, check out the API reference
|