Android 元件 Intent
使用介紹:啟動內建相機intent
關鍵程式碼 :
Intent:意圖
Intent intent = new Intent(MediaStore.ACTION_IMAGE_CAPTURE);
startActivityForResult(intent, 100);
|
@Override protected void onActivityResult
if(resultCode == RESULT_OK) {
Bitmap bitmap = data.getExtras().getParcelable("data");
imageView.setImageBitmap(bitmap);
}
|
我們開始來實現這個功能吧
詳細位置:Layout
重點事項:在Layout建立一個”Button” 和 “ImageView”
程式碼:
XML
<?xml version="1.0" encoding="utf-8"?>
<LinearLayout xmlns:android="http://schemas.android.com/apk/res/android"
xmlns:tools="http://schemas.android.com/tools"
android:layout_width="match_parent"
android:layout_height="match_parent"
android:orientation="vertical"
android:paddingBottom="@dimen/activity_vertical_margin"
android:paddingLeft="@dimen/activity_horizontal_margin"
android:paddingRight="@dimen/activity_horizontal_margin"
android:paddingTop="@dimen/activity_vertical_margin"
tools:context="com.example.andy.app_camera2.MainActivity">
<ImageView
android:id="@+id/iv_image"
android:layout_width="200dp"
android:layout_height="wrap_content"
android:layout_weight="0.29"
android:src="@mipmap/ic_launcher" />
<Button
android:id="@+id/tv_button"
android:layout_width="wrap_content"
android:layout_height="wrap_content"
android:onClick="onclick"
android:text="拍照" />
</LinearLayout>
|
XML的屬性
android:id
|
該屬性指定一個辨識符號給元件,並自動在R.java中建立索引,透過此id可用來調用元件.
|
android:layout_width
android:layout_height
|
該屬性定義元件的寬度,可使用的屬性值有"fill_parent"(填滿容器空間)、"wrap_content"(根據內部內容延展至適當大小)、"match_parent"(大致上功能與"fill_parent"相同,2.2版本才可使用).
|
android:onClick""
|
引號中指定了點擊時 調用函數的名稱
|
android:text
|
該屬性可設定文字顯示在元件上.
|
JAVA
public class MainActivity extends AppCompatActivity {
//宣告一個 ImageView
private ImageView m_ iv_image;
@Override
protected void onCreate(Bundle savedInstanceState) {
super.onCreate(savedInstanceState);
setContentView(R.layout.activity_main);
//先找到imageView的ID位置
m_ iv_image=(ImageView)findViewById(R.id.iv_image);
}
//當我按下按鈕 我就執行這個方法,view就是我設定在Layout android:onClick="onclick"的view
public void onclick(View view) {
//建立一個意圖(內建的方法)
Intent intent = new Intent(MediaStore.ACTION_IMAGE_CAPTURE);
//開始 並 回傳 這個意圖(意圖,意圖代號=100)
startActivityForResult(intent, 100);
}
//需要回傳一個意圖 所以要Override onActivityResult()這個方法
@Override
protected void onActivityResult(int requestCode, int resultCode, Intent data) {
super.onActivityResult(requestCode, resultCode, data);
//如果(請求代碼=100 且回傳代碼=RESULT_OK ) 我就執行下方程式
//P.S:請求代碼 就是發送意圖的代碼,回傳代碼通常內鍵都會設定RESULT_OK
if (requestCode==100 &&resultCode==RESULT_OK){
// Bitmap = 點陣圖
// 取得資源→data.getExtras().get("data");
// 再轉型 ↓
Bitmap bitmap = (Bitmap) data.getExtras().get("data");
//設定點陣圖片
m_ iv_image.setImageBitmap(bitmap);
//設定圖片為最適化
m_ iv_image.setAdjustViewBounds(true);
}
}
}
|
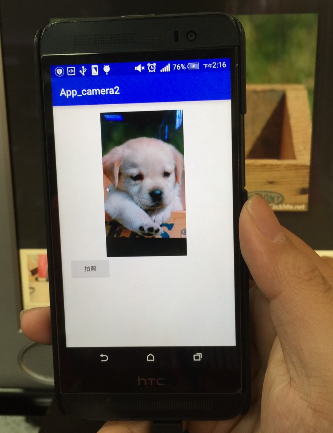
開啟APP並點擊 "拍照按鈕"
 |
對準畫面後 並按下拍照
  |
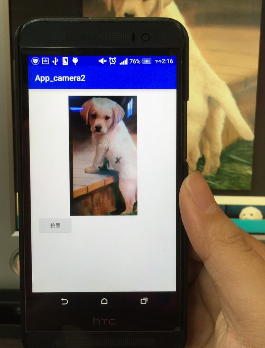
再拍一張
  |
2.延伸應用:
使用介紹:啟動內建相機Intent,並把圖片加載到動態的View中,而且可用拉桿滑動
程式碼:
Layout
<?xml version="1.0" encoding="utf-8"?>
<LinearLayout xmlns:android="http://schemas.android.com/apk/res/android"
xmlns:tools="http://schemas.android.com/tools"
android:layout_width="match_parent"
android:layout_height="match_parent"
android:paddingBottom="@dimen/activity_vertical_margin"
android:paddingLeft="@dimen/activity_horizontal_margin"
android:paddingRight="@dimen/activity_horizontal_margin"
android:paddingTop="@dimen/activity_vertical_margin"
android:orientation="vertical"
tools:context="com.example.student.app_camera2.MainActivity"
android:weightSum="1">
<ImageView
android:id="@+id/iv_image"
android:layout_width="match_parent"
android:layout_height="250dp"
android:scaleType="fitXY"
android:src="@mipmap/ic_launcher" />
<HorizontalScrollView
android:layout_width="match_parent"
android:layout_height="180dp"
android:id="@+id/horizontalScrollView" >
<LinearLayout
android:id="@+id/tv_layout"
android:orientation="horizontal"
android:layout_width="match_parent"
android:layout_height="match_parent"></LinearLayout>
</HorizontalScrollView>
<Button
android:id="@+id/tv_button"
android:layout_width="wrap_content"
android:layout_height="wrap_content"
android:onClick="onclick"
android:text="拍照" />
</LinearLayout>
|
XML
HorizontalScrollView
|
FrameLayout(框架佈局),其子項被滾動查看時是整體移動的,並且子項本身可以是一個有復雜層次結構的佈局管理器。
|
JAVA
public class MainActivity extends AppCompatActivity {
//宣告要又用的參數
private Context context;
private ImageView m_ iv_image;
private LinearLayout layout;
@Override
protected void onCreate(Bundle savedInstanceState) {
super.onCreate(savedInstanceState);
setContentView(R.layout.activity_main);
//先找到所需對應的位置、ID
findID();
context=this;
}
private void findID(){
m_ iv_image=(ImageView)findViewById(R.id.tv_imageView);
layout=(LinearLayout)findViewById(R.id.tv_layout);
}
public void onclick(View view) {
Intent intent = new Intent(MediaStore.ACTION_IMAGE_CAPTURE);
startActivityForResult(intent, 100);
}
@Override
protected void onActivityResult(int requestCode, int resultCode, Intent data) {
super.onActivityResult(requestCode, resultCode, data);
if (requestCode==100 &&resultCode==RESULT_OK){
Bitmap bitmap = (Bitmap) data.getExtras().get("data");
imageView.setImageBitmap(bitmap);
imageView.setAdjustViewBounds(true);
//產生出一個新的ImageView
ImageView imageView2 = new ImageView(context);
//設定 點陣圖 到ImageView中
imageView2.setImageBitmap(bitmap);
//設定最適大小
imageView2.setAdjustViewBounds(true);
//新增一個 ImageView
layout.addView(imageView2);
}
}
}
|
拍了數張照片後 來看看實現的效果
程式碼連結(請點我)
作者已經移除這則留言。
回覆刪除